
Imagine attaching a single light bulb to a single battery. This will be our standard for comparison. If several light bulbs are connected in series, then each individual bulb will glow dimmer than the standard and if one of the bulbs in series is removed all the other bulbs go out too.
If several light bulbs are connected in parallel, then each individual bulb will glow at the same brightness as the standard and if one of the bulbs in parallel is removed the other bulbs remain glowing at the same brightness as before removal.
Other circuit elements, such as batteries, can also be connected in series or parallel.
| Light Bulb Removed | Effect of Removal |
|---|---|
| First Bulb | |
| Second Bulb |
| Light Bulb Removed | Effect of Removal |
|---|---|
| First Bulb | |
| Second Bulb |
| Light Bulb Removed | Effect of Removal |
|---|---|
| A | � |
| B | � |
| C | � |
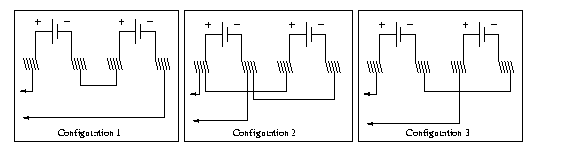
| Battery Configuration | Brightness |
|---|---|
| 1 | � |
| 2 | � |
| 3 | � |
| Battery Configuration | Type of Connection |
|---|---|
| 1 | � |
| 2 | � |
| 3 | � |

|
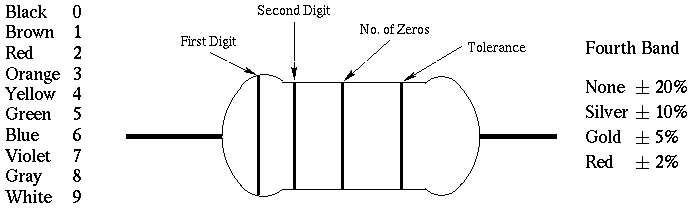
Resistor |
Color 1 |
Color 2 |
Color 3 |
Color4 |
Coded Resistance |
Tolerance |
Measured resistance |
reading error |
Agreement? |
|---|---|---|---|---|---|---|---|---|---|
|
1 |
|
|
|
|
|
|
|
|
|
|
2 |
|
|
|
|
|
|
|
|
|
|
3 |
|
|
|
|
|
|
|
|
To discover the correct setting for the meter, start the meter off at the largest setting, then work down to smaller settings, and stop at the setting which can handle both the size of the data to be measured and has the most number of significant digits in the reading. Record your results in the table below.
|
Resistor combination |
Resistance |
Voltage |
|---|---|---|
|
R12 |
|
|
|
R23 |
|
|
|
R123 |
|
|
|
R1 |
(copy from above) |
|
|
R2 |
(copy from above) |
|
|
R3 |
(copy from above) |
|
|
Resistor |
Color 1 |
Color 2 |
Color 3 |
Color4 |
Coded Resistance |
Tolerance |
Measured resistance |
reading error |
Agreement? |
|---|---|---|---|---|---|---|---|---|---|
|
1a |
|
|
|
|
|
|
|
|
|
|
2a |
|
|
|
|
|
|
|
|
|
|
3a |
|
|
|
|
|
|
|
|
|
Resistor combination |
Resistance |
Voltage |
|---|---|---|
|
R1a2a |
|
|
|
R2a3a |
|
|
|
R1a2a3a |
|
|
|
R1a |
(copy from above) |
|
|
R2a |
(copy from above) |
|
|
R3a |
(copy from above) |
|
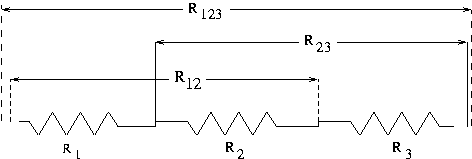
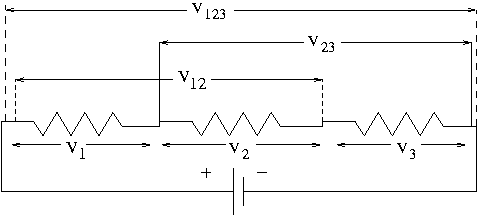
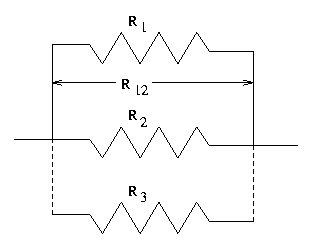
14. Now remove the series circuit (keep track of which resistor is which) and build the parallel circuit shown below using the three identical resistors. Again record Resistance and Voltage as in the circuit above. Important: When measuring Resistance across R12 and R23, you must remove the resistor not being measured from the circuit. (Removing one of its leads from a spring is sufficient - just so it is no longer part of the circuit.) If you do not do this, you will not obtain the correct results. The dashed lines below illustrate how the connection must be broken for the R12 measurement. THIS IS ONLY FOR RESISTANCE, NOT FOR VOLTAGE. During voltage measurements, keep all of your resistors in the circuit. Connect the battery to the two vacant wires and take voltage readings.
|
Resistor combination |
Resistance |
Voltage |
|---|---|---|
|
R12 |
|
|
|
R23 |
|
|
|
R123 |
|
|
|
R1 |
(copy from above) |
|
|
R2 |
(copy from above) |
|
|
R3 |
(copy from above) |
|
15. Next replace the three identical resistors with the three non-identical, being careful to keep track of which one is R1a, etc. Do the measurements performed on the previous circuit again, with the same caution about removing the R3 resistor from the R1R2 measurement and the R1 resistor from the R2R3 measurement.
|
Resistor combination |
Resistance |
Voltage |
|---|---|---|
|
R1a2a |
|
|
|
R2a3a |
|
|
|
R1a2a3a |
|
|
|
R1a |
(copy from above) |
|
|
R2a |
(copy from above) |
|
|
R3a |
(copy from above) |
|
Questions:
1. Were the resistors within the manufacturer's tolerance?
2. What general rule did you observe for combining resistances in a series circuit? Did both identical and non-identical resistor patterns follow this rule?
3. What general rule did you observe for combining resistances in a parallel circuit? Did both identical and non-identical resistor patterns follow this rule?
4. How does voltage behave in a series circuit? What differences, if any, did you observe between the identical resistors and the non-identical?
5. How does voltage behave in a parallel circuit? What differences, if any, did you observe between the identical resistors and the non-identical?
 Back to the Electricity and Magnetism Manual